Building Virtual Openstack Quantum Testing Environment
If I’m talking about VM, it is virtual machine in KVM in my notebook where Openstack and his services are installed and Netapp simulator is installed. In case of instances, I mean virtual machines created within OpenStack, so it is VM in VM.
What is purpose of this environment
I wanted to simulate my original real environment and real installation steps as close to reality as possible, to prepare for real installation.
Why I did’n use DevStack?
Installation of DevStack is automated and it was hard for me to guess what is going on in background.
Here you can see my environment which I built in my notebook:
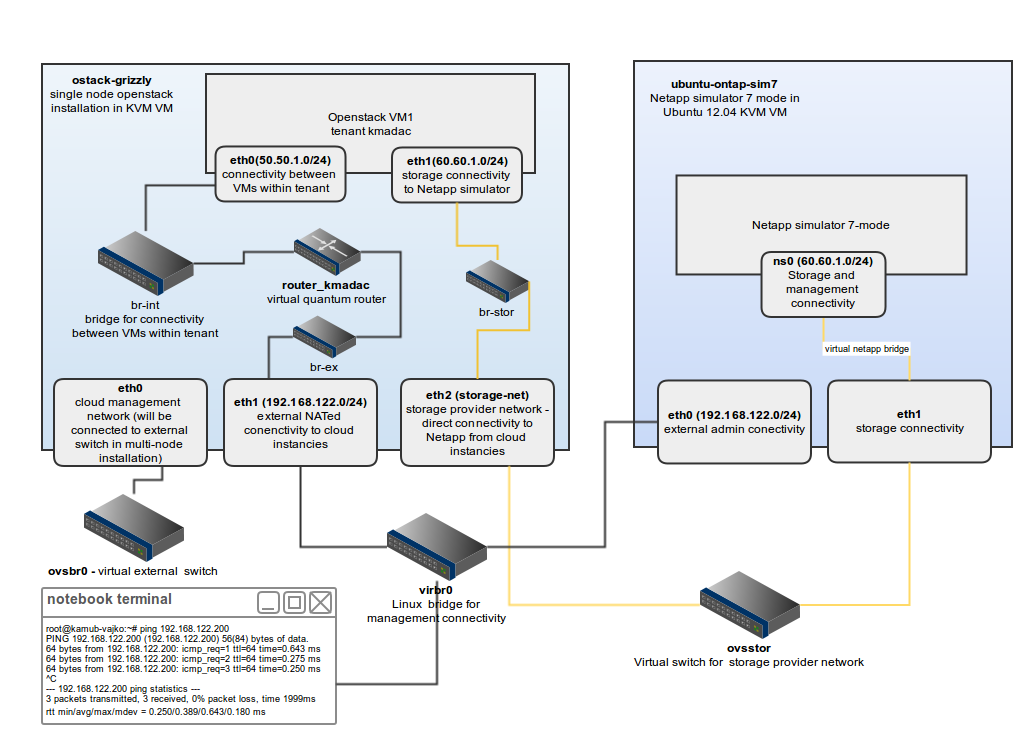
You can see two VMs which simulates two physical nodes. One node ostack-grizzly which was used for installation of Grizzly single node installation and ubuntu-ontap-sim7 which was Ubuntu 12.04 LTS with Netapp Simulator in 7-mode.
Virtual switch for connecting VMs
I created two virtual switch in order to interconnect my two VMs. One switch ovsbr0 for which will be used for connection between OpenStack nodes (as this article is only about single-node installation, I created it only for possible future use) and ovsstor used for simulation of physical connectivity between OpenStack instances and Netapp (provider network)
Create two openvswitch switches:
ovs-vsctl add-br ovsbr0
ovs-vsctl add-br ovsstor
ostack-grizzly VM
I created VM with 2GB of RAM and 6GB of disk space. I installed Ubuntu 12.04 LTS and used KVM as Hypervisor and configured 3 interfaces for VM in following order - eth0, eth1, eth2. Here is snippet from output of command
virsh dumpxml ostack-grizzly
    <interface type='bridge'>
      <mac address='52:54:00:5c:eb:4a'/>
      <source bridge='ovsbr0'/>
      <virtualport type='openvswitch'>
        <parameters interfaceid='784ee2ba-6cd6-948a-922a-bda1abcdf01c'/>
      </virtualport>
      <target dev='vnet1'/>
      <alias name='net1'/>
      <address type='pci' domain='0x0000' bus='0x00' slot='0x07' function='0x0'/>
    </interface>

    <interface type='network'>
      <mac address='52:54:00:2c:e0:52'/>
      <source network='default'/>
      <target dev='vnet0'/>
      <model type='virtio'/>
      <alias name='net0'/>
      <address type='pci' domain='0x0000' bus='0x00' slot='0x03' function='0x0'/>
    </interface>

    <interface type='bridge'>
      <mac address='52:54:00:9b:83:16'/>
      <source bridge='ovsstor'/>
      <virtualport type='openvswitch'>
        <parameters interfaceid='0707a806-bf64-ac37-c548-1a57c65bc60b'/>
      </virtualport>
      <target dev='vnet4'/>
      <alias name='net2'/>
      <address type='pci' domain='0x0000' bus='0x00' slot='0x08' function='0x0'/>
    </interface>
eth0 - interface used by OpenStack services. Openstack Services and APIs are listening on this interface. In case of multi-node installation, compute node and network node communicates with control node over this interface.
eth1 - interface used for external connectivity to OpenStack instances and also management interface for KVM VM. I used IP addresse assigned on this interface to ssh to VM. Connected to virbr0.
eth2 - interface used for provider network connectivity. IP addresses from this network will be assigned to instances created in OpenStack
I used Virtual Machine Manager to configure VMs. There is a trick to connect created interface to openvswitch. Firstly, create interface as you would like to create normal single interface.
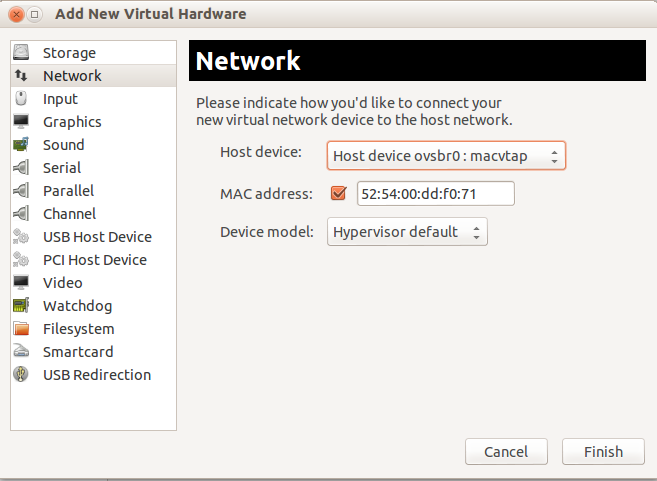
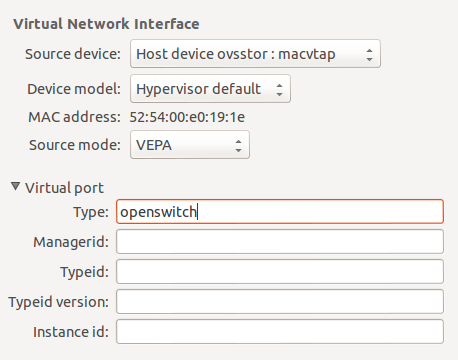
Finish it, Select it in the left menu, change source mode to Bridge and put openwswitch to Virtual port type
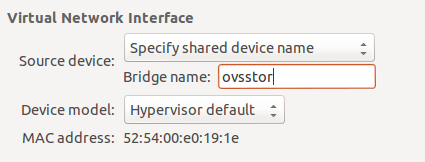
Then select Specify shared device name in Source device and enter Bridge name (ovsstor and ovsbr0 in my case).
After boot up of VM, 3 interfaces were detected by Linux kernel. I had to reorder it them by modification of udev rules in /etc/udev/rules.d/70-persistent-net.rules. In case you cannot see any rule, you can see how to generate them in another article in my blog. It is important to know which interface is connected to which virtual switch.
I used following configuration in /etc/networking/interfaces to have everything prepared for OpenStack installation.
# The loopback network interface
auto lo
iface lo inet loopback

# The primary network interface
auto eth0
iface eth0 inet static
address 10.10.100.51
netmask 255.255.255.0

auto eth1
iface eth1 inet manual
up ifconfig $IFACE 0.0.0.0 up
up ip link set $IFACE promisc on
down ip link set $IFACE promisc off
down ifconfig $IFACE down

auto br-ex
iface br-ex inet static
address 192.168.122.200
netmask 255.255.255.0
gateway 192.168.122.1
dns-nameservers 8.8.8.8

auto eth2
iface eth2 inet manual
up ifconfig $IFACE 0.0.0.0 up
up ip link set $IFACE promisc on
down ip link set $IFACE promisc off
down ifconfig $IFACE down

auto br-stor
iface br-ex inet manual
up ifconfig br-stor up
According to this article I used workaround to turn off networking boot delay, because /etc/network/interfaces is not compatible with OpenvSwitch. I modified /etc/init/failsafe.conf and decreased sleep time to 1:
$PLYMOUTH message --text="Waiting for network configuration..." || :
sleep 40
$PLYMOUTH message --text="Waiting up to 60 more seconds for network configuration..." || :
sleep 59
$PLYMOUTH message --text="Booting system without full network configuration..." || :
to
$PLYMOUTH message --text="Waiting for network configuration..." || :
sleep 1
$PLYMOUTH message --text="Waiting up to 60 more seconds for network configuration..." || :
sleep 1
$PLYMOUTH message --text="Booting system without full network configuration..." || :
OnTap Simulator VM
This is VM, where I installed old 7-mode OnTap Simulator. It is default Ubuntu 12.04 Server with 2 NICs. eth0 is default NIC eth1 is connected to ovsstor openvswitch bridge. This bridge is simulation of provider network between OpenStack instancies and OnTap Simulator. During OnTap initialization assign ns0 interface to eth1 and assign static IP address from provider network subnet (60.60.1.200 in my case).
Install OpenStack Grizzly
VMs are now prepared and we can install OpenStack Single Node installation using guide on ostack-grizzly VM.
Configuration of provider network
After installation OpenStack, let’s setup our provider network which gives us possibility to communicate directly between OpenStack instancies and Netapp Simulator. Each instance will have one interface with IP address assigned from provider network subnet.
Storage provider network will be on interface eth2. I need to put eth2 to ovs bridge. I named it br-stor. Execute commands on ostack-grizzly VM:
root@ostack-grizzly:/etc/network# sudo ovs-vsctl add-br br-stor
root@ostack-grizzly:/etc/network# sudo ovs-vsctl add-port br-stor eth2
Storage bridge br-stor has to be mapped to physical network. I named it storage-net and network_vlan_ranges in ovs_quantum_plugin.ini have to be set without defining vlans. Add following two lines into /etc/quantum/plugins/openvswitch/ovs_quantum_plugin.ini
network_vlan_ranges = storage-net
bridge_mappings = storage-net:br-stor
Restart quantum services:
root@ostack-grizzly:/etc/init.d# cd /etc/init.d/; for i in $( ls quantum-* ); do sudo service $i restart; done
And create provider network in admin tenant:
root@ostack-grizzly:/etc/init.d# keystone tenant-list
+----------------------------------+---------+---------+
|                id                |   name  | enabled |
+----------------------------------+---------+---------+
| 6ed0f3ea6ded4e93b332f9f09445147d |  admin  |   True  |
| fd72d988e9b44e7cb86d621d9206f82b |  kmadac |   True  |
| e89b8887f2f94b9aa05aca5fe2b0e2b9 | service |   True  |
+----------------------------------+---------+---------+
Create shared provider network. It has to be shared to be able to use it by all tenants.
root @ostack-grizzly:/etc/init.d# quantum net-create storage --shared --tenant_id 6ed0f3ea6ded4e93b332f9f09445147d --provider:network_type flat --provider:physical_network storage-net
Create subnet for tenant kmadac (do not create it for admin tenant):
root@ostack-grizzly:/etc/init.d# quantum subnet-create --tenant_id fd72d988e9b44e7cb86d621d9206f82b --name storage_subnet --no-gateway --allocation-pool start=60.60.1.50,end=60.60.1.150 storage 60.60.1.0/24
We created subnet storage_subnet without gateway, and instances will get IP addresses from the the range 60.60.1.50 - 60.60.1.150.
Does it work?
Lets’s boot new instance and create 2 NICs on that VM. One NIC will be connected to net_kmadac and second one to our provider network called storage.
We will need network ids to define VM’s NICs:
root@ostack-grizzly:~/scripts# quantum net-list
+--------------------------------------+------------+---------------------------------------------------+
| id                                   | name       | subnets                                           |
+--------------------------------------+------------+---------------------------------------------------+
| 65c12de7-610e-44b5-afbd-78cb225350f5 | ext_net    | cb128b23-8f50-4ca7-9cc3-41d88702c9e5              |
| b66205c6-96c9-4d05-a711-850bb18e93b3 | storage    | 2191bf8b-25ba-4b8d-be51-e83680751d11 60.60.1.0/24 |
| de8777ab-6900-4aa5-9057-80ce2fcb9ea2 | net_kmadac | 25821a30-173f-4666-9f3d-a3a68ed3eaf5 50.50.1.0/24 |
+--------------------------------------+------------+---------------------------------------------------+
Now, we can start new instance called storage_vm:
root@ostack-grizzly:~/scripts# nova boot storage-vm --flavor 3170eb03-48ba-40eb-9b5b-5441535a33fa --image 2cdb00e8-cfad-4cb4-ab11-204d90dbf111 --nic net-id=de8777ab-6900-4aa5-9057-80ce2fcb9ea2 --nic net-id=b66205c6-96c9-4d05-a711-850bb18e93b3
Once, it is completed, we can see that networks were added to instance storage-vm:
    root@ostack-grizzly:~/scripts# nova list
+--------------------------------------+------------+--------+-----------------------------------------------------------+
| ID                                   | Name       | Status | Networks                                                  |
+--------------------------------------+------------+--------+-----------------------------------------------------------+
| 9bf500f4-16b7-46d4-ae4b-33bae4fb97bf | my_next_vm | ACTIVE | storage=60.60.1.51; net_kmadac=50.50.1.4, 192.168.122.213 |
| 58320836-4398-4e75-be41-4706fe13d308 | storage-vm | ACTIVE | storage=60.60.1.52; net_kmadac=50.50.1.3                  |
+--------------------------------------+------------+--------+-----------------------------------------------------------+
Let’s check, how it looks directly on instance. We do not have floating IP assigned, so I will use ostack-grizzly VM to ssh to machine. But it is not so ease, because instance is running behind IP namespace. Each network in quantum has its own namespace. You can list namespace like this:
root@ostack-grizzly:~/scripts# ip netns
qrouter-8fde0eae-76cd-4f41-8470-65dc93e47dbd
qdhcp-de8777ab-6900-4aa5-9057-80ce2fcb9ea2
qdhcp-b66205c6-96c9-4d05-a711-850bb18e93b3
Numbers after qdhcp are UUID of our quantum networks, so if we compare it with quantum net-list output we found that qdhcp-de8777ab-6900-4aa5-9057-80ce2fcb9ea2 is namespace which we have to use to access the instance. Now lets ssh to instance:
ip netns exec qdhcp-de8777ab-6900-4aa5-9057-80ce2fcb9ea2 ssh cirros@50.50.1.3
If everything is configured correctly, we should be logged in now.
I used cirros image for the instance, which have DHCP discovery configured only on eth0. To get address from openstack dhcp server we have to execute:
sudo udhcpc -i eth1
Now, try to ping Netapp filer from our instance. If it works we are done.
$ ping 60.60.1.220
PING 60.60.1.220 (60.60.1.220): 56 data bytes
64 bytes from 60.60.1.220: seq=0 ttl=64 time=3.869 ms
64 bytes from 60.60.1.220: seq=1 ttl=64 time=0.736 ms
^C
--- 60.60.1.220 ping statistics ---
2 packets transmitted, 2 packets received, 0% packet loss
round-trip min/avg/max = 0.736/2.302/3.869 ms
Conclusion
I have configured my Openstack Environment which is from network point view, almost the same, as I will have on real machines. In next steps I will try to prepare multi-node installation.
Tweetcomments powered by Disqus